
CIP280 Desk Phone User Guide
Thank you for purchasing the ClearlyIP CIP280 IP Desk Phone. The CIP280 is a smart IP phone with a five-inch touch IPS screen and a built-in camera. It has an HDMI port for external display, two multi-function USB ports, built-in Bluetooth, and dual-band Wi-Fi (2.4G/5G). It supports up to ten-way audio/video mixed conferencing, and its high-resolution IPS screen and HD Voice provide a lifelike visual and audio experience.
CIP280 USER GUIDE
CIP280 Button Overview

LED
STATUS INDICATOR
Steady green when power on, blinking red when the phone is ringing (can be customized).
Answer a Call
THREE WAYS TO ANSWER A CALL
- Handset: Pick up the handset.
- Speaker: Press .
- Headset: Press .
Note: You can also reject the call by pressing the key.
End a Call
THREE WAYS TO END A CALL
- Handset: Hang up the handset or press the key.
- Speaker: Press , or press the cancel key.
- Headset: Press the key.
Place a Call
THREE WAYS TO MAKE A CALL
- Handset: Pick up the handset; enter the number, then press or press #.
- Speaker: Press enter the number, then press the send key or press #.
- Headset: Press ; enter the number, then press or press #.
Note: You can also use Contacts or call log to dial the number you want, press dial key and place the call by the three ways mentioned. More, you can also alternate the mode during the call.
Mute Call
- Press to mute the microphone during the call.
- Press again to un-mute the conversation.
Redial
- Press to redial the last call that was that was dialed.
Hold
- Press or during a call to hold the call.
- Press or to resume the call.
Call Transfer
THREE WAYS TO TRANSFER A CALL
Blind Transfer:
- press or tap during the conversation, the call is on hold now.
- Enter the number you want to transfer to and press or .
- Select transfer mode as blind transfer. At this time, the previous call is ended, and the blind transfer is completed.
Attended Transfer
- press or during the conversation, the call is on hold now.
- Enter the number you want to transfer to and press .
- Select transfer mode as Attend transfer. At this time, the previous call has not ended and is on hold.
- After the transfer object picks up the call, press or again. At this time, the call is transferred to the transfer object, and the attend transfer is completed.
Semi-Attended Transfer
- Press or during the conversation, the call is on hold now.
- Enter the number you want to transfer to and tap .
- Select transfer mode as Attend transfer. At this time, the previous call has not ended and is on hold.
- Before the transfer object picks up the call, press or again. At this time, the call is transferred to the transfer object, and the semi-attend transfer is completed.
Call Conference
ADDING MEMBERS TO A CONFERENCE CALL
Assuming that “A” and “B” are in conversation. “A” wants to bring “C” (or “D” & “E”) in a conference:
- “A” presses , the call is placed on hold.
- “A” enters the number of “C” and then presses or #., “C” answers the call.
- “A” presses then “A”, “B” and “C” are now in a conference.
- If add “D” & “E”, “A” presses , the current conference is on hold, presses and dials “D”, “D” answer the call. “A” Press and and dials “E”, “E” answers the call. “A” presses the conference soft key, then “A”, “B”, “C”, “D” and “E” are in a conference.
Note: (1) If “C” does not answer the call, “A” can go back to continue to the conversation with “B”.
(2) Once “A” hangs up the call, the conference ends, while if “B” or “C” drops the call, “A” & “C” or “A” & “B” conversation continues.
Bluetooth
The Model connects to a wide range of Bluetooth Headset, compatible with
Bluetooth specification V4.2 and backwards compatible with 1.1, 1.2, 2.0 and 3.0.
How to enable headset mode?
- Find Menu then navigate as follows: Settings-> Basic Settings-> Headset
- Enable the Headset priority.
- Choose the “Ringer Device” from “Use Headset”, “Speaker & Headset” option
- Press the save button to save the configuration.
- Press the headset key on phone’s during the idle status when you accomplish the above mentioned configuration. Headset icon will display on phone status bar
How to activate Bluetooth via phone interface?
- Find Menu then navigate as follows: Settings-Basic-Connected devices
- Select Connection Preference-Bluetooth, press to turn on.
How to scan the Bluetooth headset device on phone interface?
- Find Menu then navigate as follows:
- Settings-Basic-Connected devices -> Pair new device
- The phone will enter the scan interface, the phone starts searching for Bluetooth headsets within the working range.
- All detected Bluetooth headsets will display on the phone.
- Choose the desired Bluetooth Device from the list and connect to it:
- When you back to idle interface, you will see the connected successfully icon.
- If you want to disconnect with this Bluetooth device, you can press the Settings button, then press the “Disconnect” button.
WI-Fi
How to enable Wi-Fi feature via phone interface?
- Find Menu then navigate as follows: Settings-> Basic ->Wi-Fi
- Press the Switch button to turn on Wi-Fi feature.
How to connect to an available wireless network via phone interface?
- Find Menu then navigate as follows: Settings-> Basic ->Wi-Fi
- The phone will automatically search for available wireless networks in your area.
- Select an available wireless network from the list of networks.
- Enter the password if needed.
- Tap Connect to connect to the wireless network.
- Normally, the phone will successfully connect to Wi-Fi.
How to add a Wireless Network Manually via phone interface?
- Find Menu then navigate as follows: Settings->Basic ->Wi-Fi->Add network.
- Enter the desired wireless network (SSID). Select a Security Mode. Enter the password if needed
- Press the “Save” button to save the configuration. You can choose this wireless network to connect it.
How to view Wireless Network status?
- If the connection is successful and obtained IP, a filled wireless network icon will be displayed in the idle status bar. If the connection failed, a hollow wireless network icon will be displayed in the idle status bar.
Note: Contact your network administrator for the Wi-Fi password.
How to disable Wi-Fi feature via phone interface?
- Find Menu then navigate as follows: Settings-> Basic ->Wi-Fi
- Press the Switch button to turn off Wi-Fi feature.
CIP280 USER GUIDE
CIP280 Configuration
Configuration Via Phone
- Press Setting → Advanced Settings (Default password: admin)
- Select Network: To configure the Wan Port (DHCP/Static/PPPoE), PC Port etc.
- Select Accounts: Enable the account, fill in the SIP Server, Outbound Proxy and the SIP registration information.
Configuration Via Web
- Get the IP address from the phone: Press Setting → Status → Information.
- Login: Input the IP address in the web browser (Login name: admin ; Default password: admin).
- Configuration: Fill in the SIP Server info on the Profile page and the Account registration info on the Account page.
- Click on Save Set.
CIP280 USER GUIDE
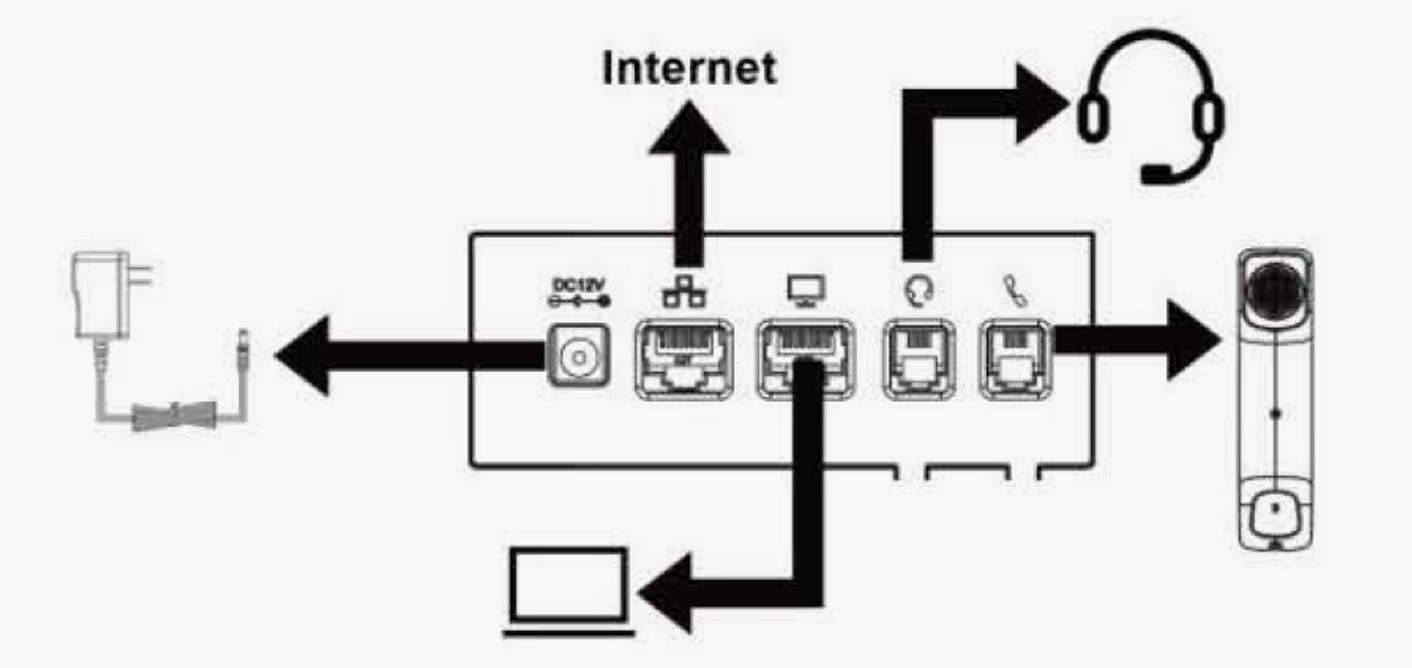
CIP280 Connection Diagram
CIP280 Phone Stand Diagram
Notice: When you want to change from the low angle position to another positions. Please take out the hook switch then rotate it 180 degrees then slide it back into it’s groove.
